How to Screen Record on iPhone: Complete 2026 Guide (Including App-Specific Recordings)
Quick Answer
To screen record on iPhone:
- Add Screen Recording to Control Center (Settings > Control Center).
- Open Control Center and tap the record icon.
- Wait for the 3-second countdown.
- Tap the red status bar to stop — the video saves to Photos automatically.
Screen recording on iPhone captures on-screen actions as video, ideal for tutorials, demos, or sharing gameplay. Apple’s built-in tool, available since iOS 11 and updated through iOS 18, saves recordings directly to Photos.
Enable Screen Recording
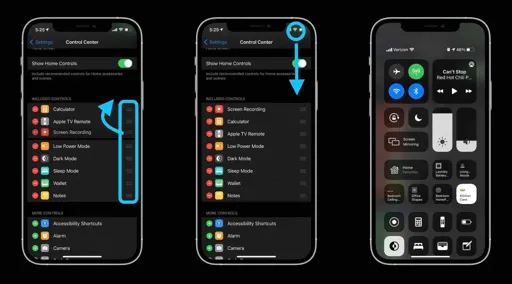
First, add the Screen Recording button to Control Center if it’s missing. Go to Settings > Control Center, find Screen Recording under More Controls, and tap the green plus icon.
On iPhones with Face ID (iPhone X and later), swipe down from the top-right corner to open Control Center. Older models with Home button swipe up from the bottom.
This setup persists across recordings, so repeat only if customized out.
Basic Screen Recording Steps
Swipe down to open Control Center and tap the Screen Recording icon (circle inside a circle). A 3-second countdown starts, then recording begins with a red status bar or Dynamic Island indicator.
To stop, tap the red circle in the top bar and confirm Stop, or return to Control Center and tap the red icon. Recordings save automatically to Photos app under Recents or Albums > Screen Recordings.
Note that some apps block recording due to content protections, and you can’t record while screen mirroring.
Record with Audio
For voiceover or ambient sound, long-press the Screen Recording icon in Control Center. Tap the Microphone button to turn it on (turns red).
Proceed to Start Recording after the countdown. This captures mic input alongside system audio; use a quiet space or headphones for clarity.
Internal app audio records by default without mic; mic adds external narration.
Customize Recording Options
In Settings > Control Center, reorder controls for quick access. Adjust screenshot/recording formats in Settings > Camera > Formats: choose High Efficiency (HEVC, smaller files) or Most Compatible (H.264).
Long-press the icon also shows a countdown slider (adjustable in some iOS versions) and mic toggle. Recordings support HDR on compatible displays for richer color.
Edit Your Recordings
Open the video in Photos, tap Edit in the top-right. Drag timeline ends to trim clips, or use filters, crop, or markup tools for enhancements.
For advanced edits like text overlays or speed changes, stay in Photos or import to iMovie app (free from Apple). Trim removes excess footage without quality loss.
Save as new video to preserve originals.
Manage File Sizes
Screen recordings use HEVC by default, keeping sizes reasonable (e.g., 1 minute ~100-200MB at 1080p 60fps). Switch to SDR in Camera settings for smaller files on non-HDR viewing.
Compress via third-party apps like Video Compress from App Store, or export to lower resolution in editing. Delete unused clips via Photos to free space.
Share and Export Recordings
From Photos, tap Share icon to send via Messages, Mail, AirDrop, or upload to YouTube/iCloud. Trim before sharing to reduce size.
For social media, edit in CapCut or similar for optimized exports. Long recordings may need compression apps for platforms like Instagram.
AirDrop to Mac for further editing in Final Cut Pro.
Troubleshooting Common Issues
If the button is grayed out, check Screen Time restrictions in Settings > Screen Time > Content & Privacy Restrictions. Restart iPhone or update iOS via Settings > General > Software Update.
No audio? Ensure mic was on during setup; test in quiet area. App blocks? Try external recording via QuickTime on Mac (connect iPhone via USB).
Low storage or crashes: Clear space in Photos and offload unused apps.
Advanced Tips and Tricks
Hide notifications before recording: Enable Do Not Disturb. Use external mic via Lightning/USB-C for pro audio.
For scrolling captures, third-party apps like Picsew process screenshots or recordings into long images. Record games at 60fps by ensuring ProMotion display on Pro models.
Integrate with apps like StreamYard for polished streams by mirroring iPhone screen to computer.
How to screen record specific apps only on iPhone
iPhone’s built-in screen recorder captures the entire screen, including app switches and home gestures, with no native option to limit to one specific app.
Use Built-in Recorder Strategically
Open the target app first, then start recording from Control Center. Avoid swiping or multitasking to minimize captures of other screens; stay focused within the app.
Enable Do Not Disturb beforehand to prevent notifications from appearing. Stop via the red status bar without leaving the app.
This manual approach keeps most footage app-specific, though the red recording indicator remains visible.
Developer Option: ReplayKit for Apps
For app developers, ReplayKit’s RPScreenRecorder records only within that app’s bounds—stops if backgrounded.
Integrate via Xcode: import ReplayKit, start RPScreenRecorder.shared().startRecording, handle preview on stop. Users access via the app, not system-wide.
Not for end-users; requires building/customizing apps.
Third-Party Apps and Workarounds
Apps like Loom or Go Record use system recording but add editing to crop/trim non-app parts post-capture.
Mirror iPhone to Mac via QuickTime or AirPlay, then record the mirrored window with desktop tools (e.g., OBS) for app-focused cropping.
No App Store app bypasses system limits for true app-only recording due to iOS sandboxing.
Limitations and Tips
iOS privacy rules prevent true app-specific system recording to protect sensitive data across apps.
For clean results, practice smooth navigation, edit in Photos/iMovie, and test short clips first. Update to latest iOS 18+ for best stability.
FAQ
Yes, it uses significant power due to constant encoding; limit to short sessions and plug in.
No, Apple blocks it for privacy; audio may not capture.
No strict limit beyond storage (hours possible), but heat may throttle after 30-60 minutes.
Supports higher-res Spatial Video recording, but standard screen record unchanged in iOS 18.